Introduction
UPDATE October 2022: Raspberry Pi prices have significantly increased due to short supply. They used to make more sense as machines for basic servers, though now you might be better off using an old laptop or mini computer instead of the Pi.
The guide applies the same for (basically) any PC running linux, just keep it in mind!
For this project, I wanted to test the feasibility of running a Raspberry Pi as an access point. Another reason why I wanted to build it myself instead of buying an access point is because part of my house practically does not have any WiFi signal, and it becomes a problem when using mobile devices. Since I already had a raspberry pi with wireless capabilities, and wanted to learn more about how to set up an access point, not only is it a zero cost solution for me, but I get to learn in the process.
It turns out, if you have a Raspberry Pi that has on-board wifi, you have everything you need to build your own wifi access point! In fact it could be any computer with a wired connection and a wireless card, but the pi is compact and consumes very little power, making it a plus for running 24/7 and not just as a test. In the case that you are using another computer that is not the Pi, then you will need to see if its wireless interface can be used in AP mode.
I found some tutorials online on how to do this, but none were fully what I wanted or were incomplete, so I decided documenting the process for future reference would be helpful.
What is an access point?
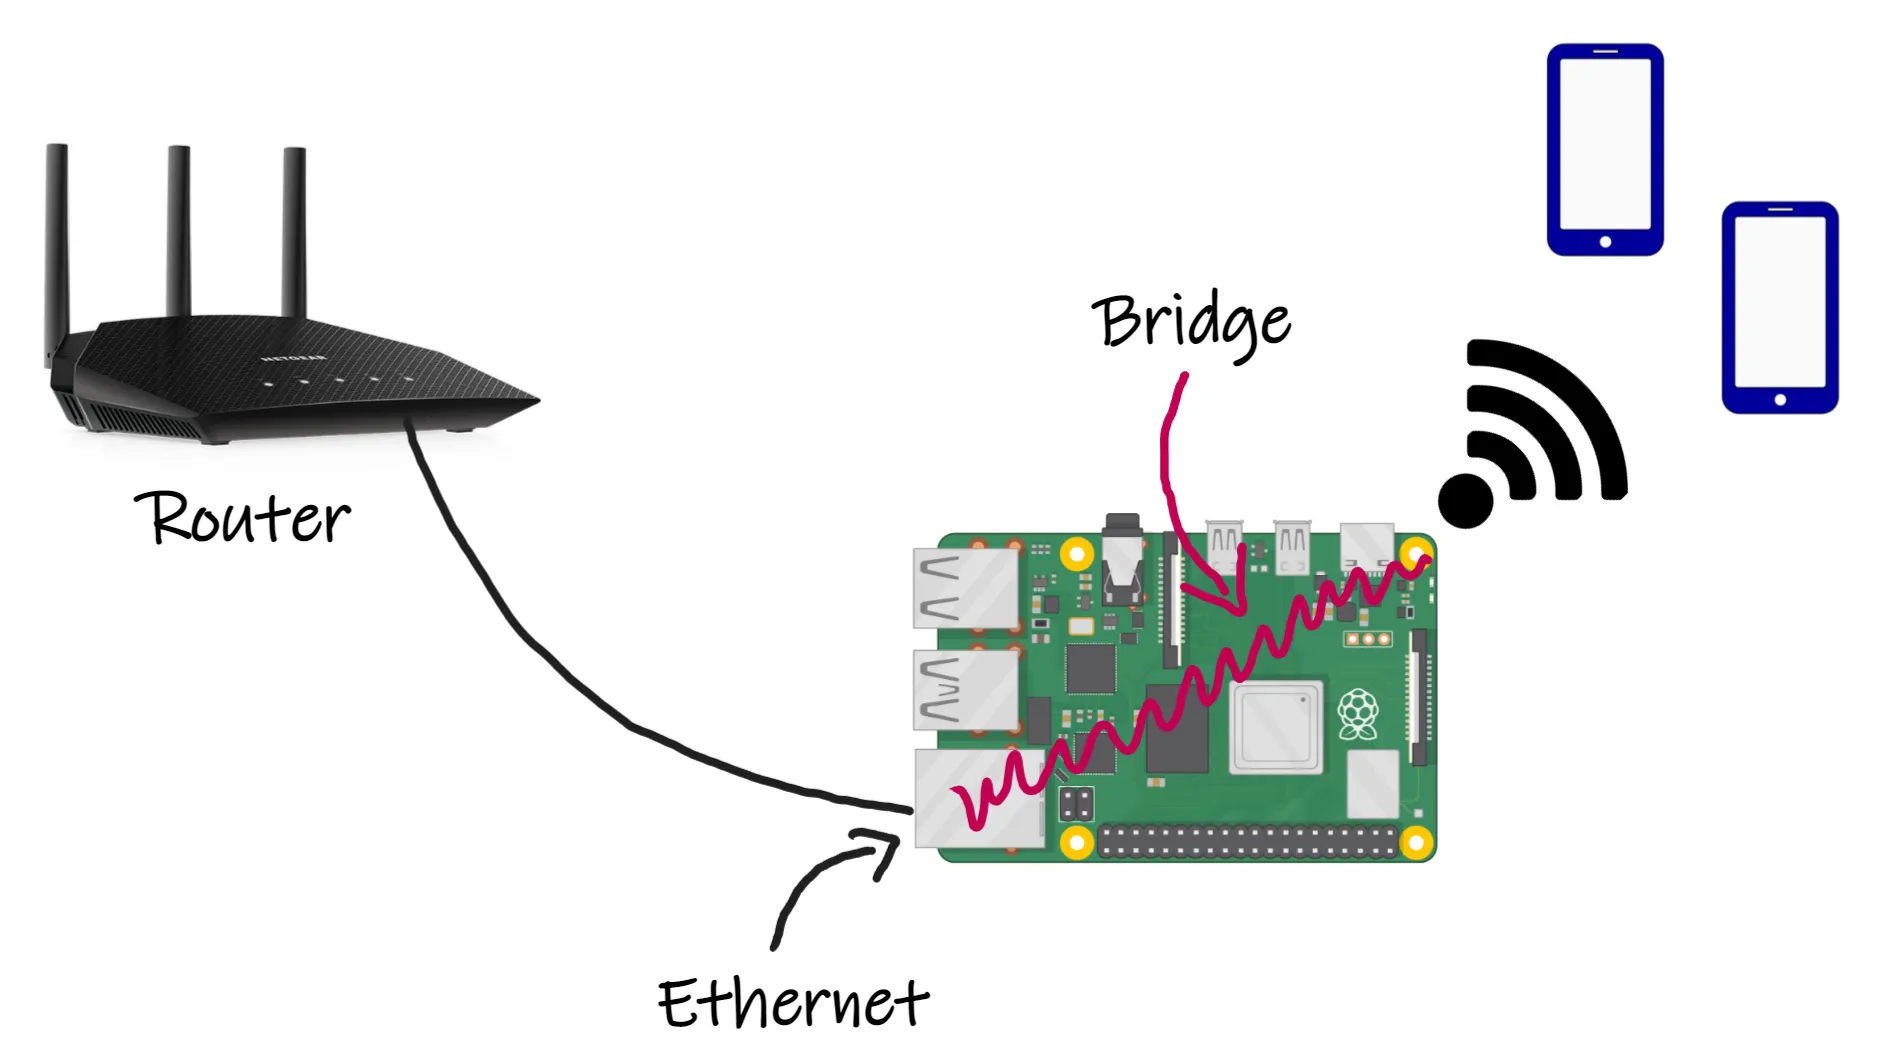
There are different types of access points, but they all allow wireless devices to connect to a wired network. The type of access point that I want to set up is a bridge. This “converts” the wired signal from the ethernet port to a wireless signal and vice versa. From there, your wireless device like your phone can connect to the access point which acts like a bridge to your wired connection.
Here is a diagram explaining it better:
Setting up the Pi
For this tutorial you will need:
- A windows, mac or linux computer.
- Raspberry Pi 3 or 4 w/ wifi: https://amzn.to/3RdsuUo
- 16 gb micro SD card (or larger): https://amzn.to/3xQThz0
- Power cord: https://amzn.to/3SvEQsm
- Ethernet cable: https://amzn.to/3C9wocQ
- Wifi dongle (if your Pi does not have integrated wireless): https://amzn.to/3BBZJuQ
You can also get a kit like the one here: https://amzn.to/3BMtZTQ
If you already have a pi, great! If you don’t, for this project I would not get anything with more than 1GB of RAM, since for this application it will most likely not make a difference. Just get the one that has integrated wireless, or get a wifi dongle in case it does not.
Installing the OS
Firstly, install the OS on the pi. For this I use the official Raspberry Pi Imager. I suggest installing a lightweight, purpose built for the pi OS. For that I went with Raspberry Pi OS Lite 32 bit.
Plug in your SD card to your PC, select the OS you want to install, select the SD card that you plugged in (make sure it is the right one!).

Before you hit write, check the settings and select “enable SSH” and set a username and password.
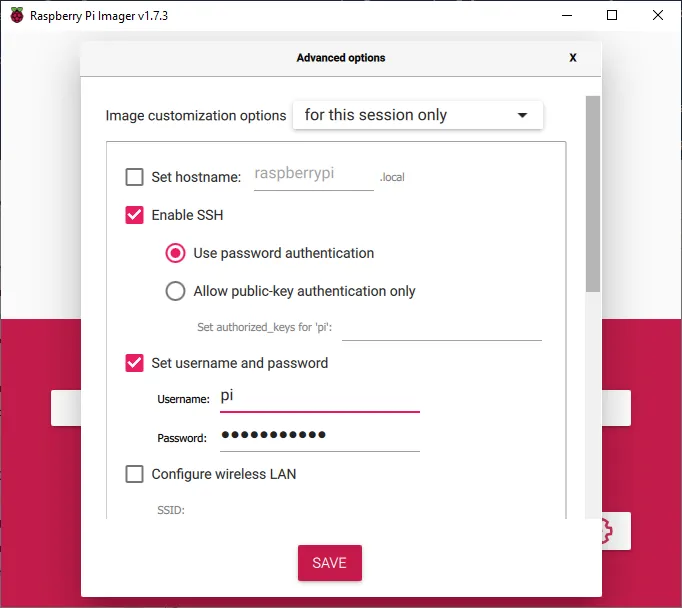
Click save and hit write. Let it write and ignore any file explorer windows that may pop up.
Connecting to the Pi
Plug your sd card into your pi, and connect the ethernet and power cables. Wait a minute for it to boot up and find its IP address. You can do that by visiting your router’s configuration site or with software like Angry IP scanner. If you don’t know what your router’s IP is, here is an excellent article going over how to find it. Once there and logged in, check the connected devices on your router’s web interface. For my router (using OpenWRT) I navigate to 192.168.1.1 on my web browser and it shows up on the homepage:
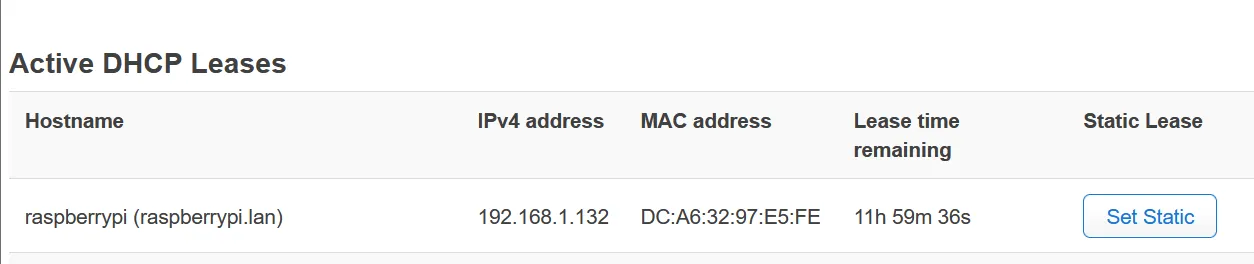
Also make it static, in my case by pressing the “Set Static” button. You can usually find the IP and settings guide for your specific router from a quick google search including your router and your ISP’s name (e.g. verizon router set static IP). A list of common ones.
Once you have the IP of the Raspberry, ssh into it. If you are on mac or linux, you can use the following command from your terminal:
ssh pi@<ip-address>
Where <ip-address> is the IP of the Raspberry Pi. If you are on windows, you can use software like Putty, insert the pi’s IP into the address box and click connect. Type yes when prompted to.
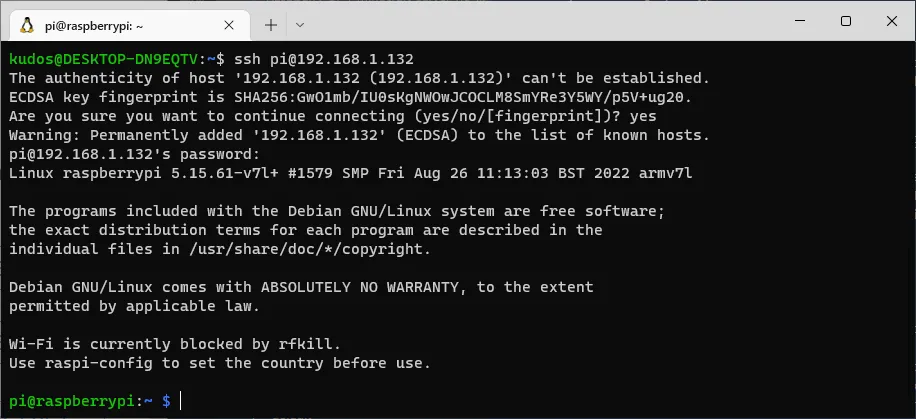
The password is the one you set up during the imaging process. Now update the pi using:
sudo apt update && sudo apt upgrade -y
This will take a few minutes. Once that is done, reboot the pi using:
sudo reboot now
Wait a minute for it to come back up. Once you connect to it again, you can move on to the next steps.
Checking wireless interface
In order to see that the wireless interface of the Pi is working and detected correctly, be it integrated or a wifi dongle, we can run the iwconfig command to see what interfaces with wireless capabilities are available.
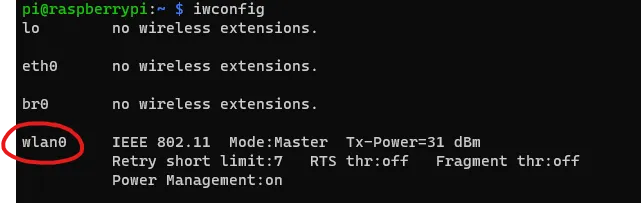
See that the wlan0 interface has some output specifying its information, while the others do not have wireless capabilities. It’s important that it shows up. If it doesn’t, which is more likely to happen if it’s a dongle, check if it is connected properly or if it needs specific drivers.
To ensure the wifi radio is not blocked, run the following command;
sudo rfkill unblock wlan
Setting up the access point
This part covers installing the packages and configuring the necessary files to use the pi as an access point.
The main program that will handle the configuration and running the access point is hostapd. Hostapd is a daemon process (runs in the background) that enables a network interface card to act as an access point. It is analogous to what your phone uses when you set up a hotspot. Install it by running:
sudo apt-get install hostapd
We also need to make sure this service is enabled for when we restart it, and by default it is masked out. Unmask it and enable using the following commands:
sudo systemctl unmask hostapd.service
sudo systemctl enable hostapd.service
Creating a network bridge
In order to create the network bridge, we will configure the system daemon that manages network configurations: networkd, or network daemon. This program runs in the background, and is configured by adding files into the /etc/systemd/network/ directory. Three types of files are used, and these are simply differentiated with their extension.
.netdevfiles are for defining virtual network devices, for example the bridge that we need to define and configure..linkfiles are an alternative to custom udev rules, which are beyond the scope of this guide..networkfiles are aimed at setting network configuration variables, things that apply to more than one virtual interface for example.
To configure our bridge, we will create a netdev file, giving it a sensible name for its function, for example bridge-br0 for the bridge we are defining:
sudo nano /etc/systemd/network/bridge-br0.netdev
And fill it with the following contents:
[NetDev]
Name=br0
Kind=bridge
With this we are creating a new virtual network device, with the name br0 and of type bridge, but we haven’t bridged to anything, just defined it.
The next file we need is a network file, which will actually “connect” the br0 interface with the eth0. Create it as follows:
sudo nano /etc/systemd/network/br0-member-eth0.network
And fill it with the following contents:
[Match]
Name=eth0

[Network]
Bridge=br0
This rule is saying; find the eth0 interface, and bridge it to the br0 interface. Notice that we haven’t connected the wlan0 interface to anything. This is because the access point software will add the wireless interface wlan0 to the bridge automatically when the service starts. This only happens with wireless interfaces.
Finally, enable the service with the following command, so that it uses the configuration files we just defined on reboot.
sudo systemctl enable systemd-networkd
Configuring hostapd
The other configuration that we need for hostapd is the configuration for the access point itself. This includes the name, password, and interface to be used (wlan0 in our case).
Open the file with the following:
sudo nano /etc/hostapd/hostapd.conf
And type the following config, replacing <network_name> and <password> with the name and password of the access point respectively. Also don’t forget to change <country_code>.
# the interface used by the AP. We also need to define the bridge
interface=wlan0
bridge=br0

# "g" simply means 2.4GHz band
hw_mode=g

# the channel to use
channel=7

# limit the frequencies used to those allowed in the country
ieee80211d=1

# the country code
country_code=<country_code>

# 802.11n support
ieee80211n=1

# QoS support, also required for full speed on 802.11n/ac/ax
wmm_enabled=1

# the name of the AP
ssid=<network_name>

# 1=wpa, 2=wep, 3=both
auth_algs=1

# WPA2 only
wpa=2
wpa_key_mgmt=WPA-PSK
rsn_pairwise=CCMP
wpa_passphrase=<password>
Hold on! This configuration is given as base, though it can be improved depending on the wireless card you have. For the Raspberry Pi 4, the one I am using, we can see from their website that it supports 2.4 GHz and 5.0 GHz IEEE 802.11ac wireless, which means we can configure hostapd to make use of it, allowing increased speeds. If your card supports it, you can add the following lines to the file:
# 802.11ac support
ieee80211ac=1
And replace the hw_mode parameter with:
# "a" simply means 5GHz
hw_mode=a
If you switch to 5GHz mode, you also have to switch channels. There is a channel=0 option that should automatically search for the channel with less interference, but I could not get it to work. So you will have to select the channel manually. To do this, run the following command:
iw list
The output will be long, but you want to find the part labeled “Frequencies”. If the wireless interface can work with 2.4GHz and 5GHz, there will be 2 sections named “Frequencies”, go to the bottommost one under “band2”:
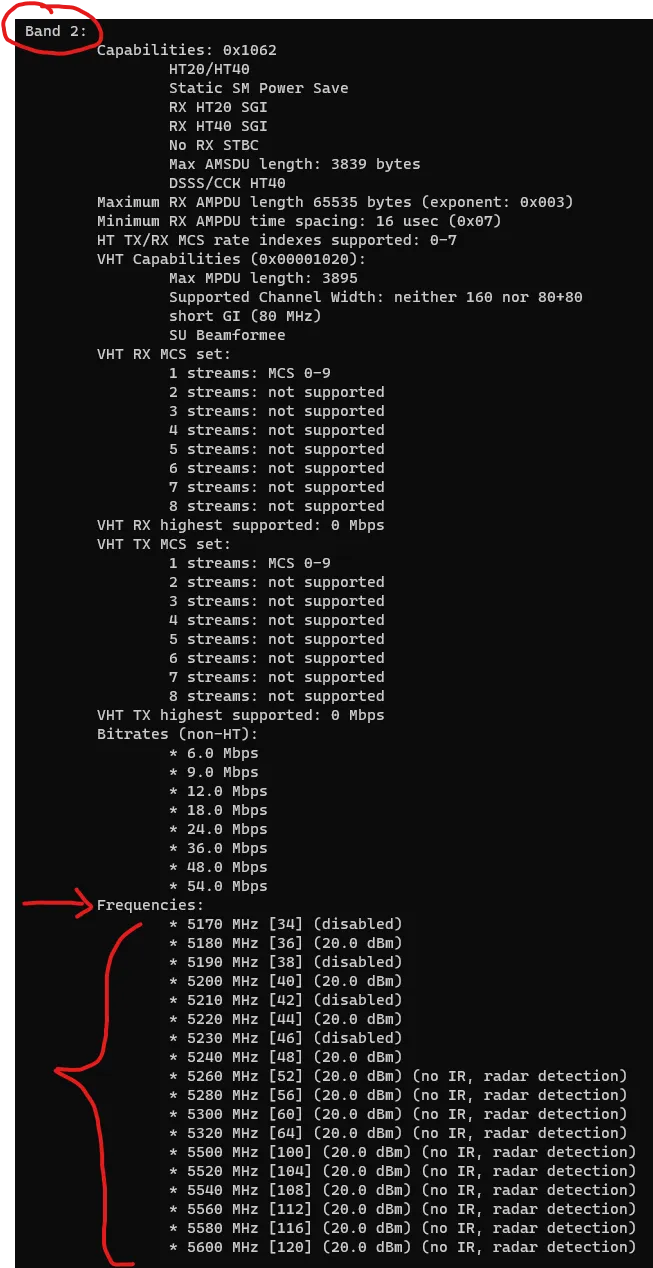
I suggest choosing a channel that does not have the no IR description (for example 36), since this means the wireless device needs to scan to see if the frequency is in use first, and it can be unreliable.
If you want to read more on configuring the /etc/hostapd/hostapd.conf file you can do so at the gentoo wiki. Their examples were used as a reference when making this guide.
IP configuration
When you connect a raspberry to the network, by default, it will ask the DHCP server (usually the router) for an IP address. This address will be given to the interface that you used to connect to the network, eth0 in our case. But this is not the behavior we want in the case of an access point. We want the bridge interface to have an IP, but not the others. We have to tell the raspberry that it needs to ask for an IP only for the bridge interface. We will use the /etc/dhcpcd.conf to configure this:
sudo nano /etc/dhcpcd.conf
Add the following line to the beginning of the file. This tells the raspberry to not ask for an IP for these interfaces.
denyinterfaces wlan0 eth0
Next is configuring DHCP defaults for br0, by adding the following line to the end of the file:
interface br0
We are almost done! Now it’s time to reboot:
sudo systemctl reboot
Testing it out
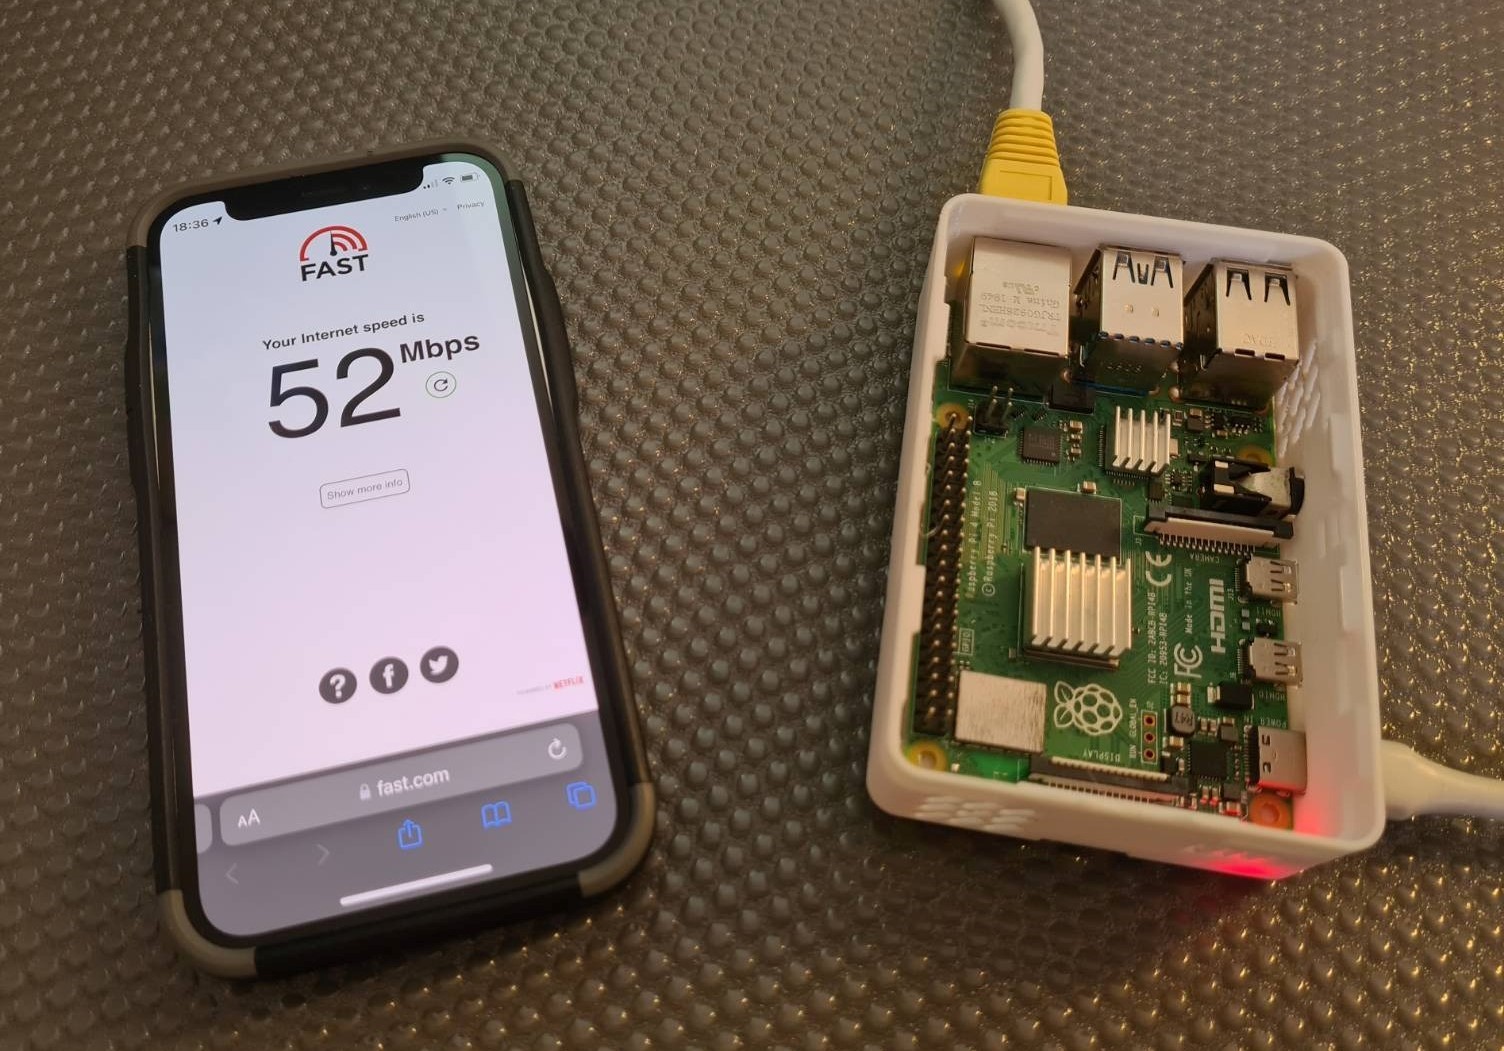
After a minute or two, the raspberry should come back up and the wireless network name you specified before should be available when you search for wifi networks on a wireless device, for example your smartphone.
Congrats!
As you can see the speeds are pretty significant for a small machine like this, and since I managed to run it in 5GHz mode the range was substantial as well. It is not braking any records but now I can have this access point running on one side of the house that before got no signal at all! I call that a win!
Hope it was helpful! Please share this on social media if you know someone that it might help! Links below!